pagelayer-logo-256
Request A Demo
By entering your email, you agree to our Terms of Service and Privacy Policy
love-subscribe

Download Pagelayer Plugin

Subscribe to our Newsletter for WordPress related news and tutorials and get a 25% discount !

New year Offer
35% Off

Offer Expired

Days
Hours
Minutes
Seconds
COUPON CODE - NEWYEAR
Download
Add a Floating Widget

Overview

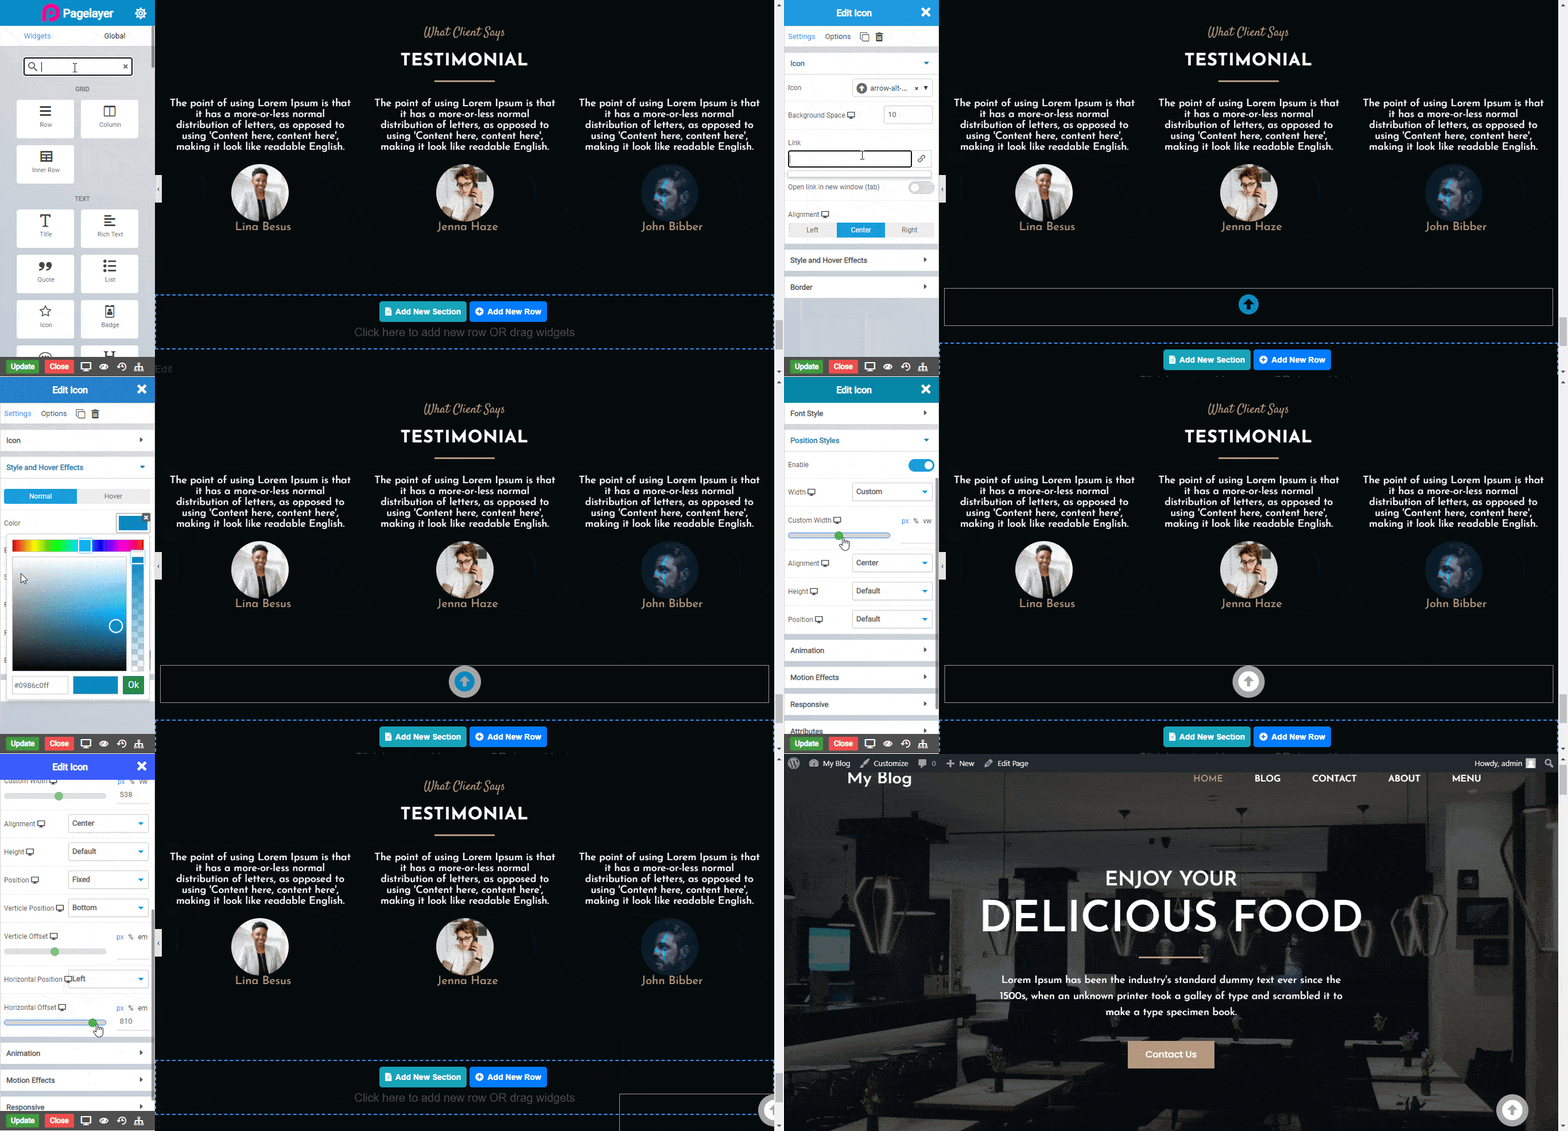
We will highlight in this documentation on How to Add a Floating Widget to your website. You can make any widget floating in your web page.

Screenshot

The following is a GIF video to show you how to make a widget floatable and the various options available :
float

Options

The following is a GIF video to show you how to make a widget floatable and the various options available :
  • Attachment : Set the type of background attachment as Scroll or Fixed. Default is set to Scroll.
  • Position X : Set the X Position of the background image as Center, Left, or Right. You can also set Custom X Position to the background image by choosing Custom type.
  • Position Y : Set the Y Position of the background image as Center, Top or Bottom. You can also set Custom Y Position to the background image by choosing Custom type.
  • Repeat : Choose the repeat styling of the background image as Repeat, No-Repeat, Repeat-X, Repeat-Y.
  • Size: Choose the size type of the background image as Cover or Contain.

Description

To make any widget Floating, you have to follow the below points.
  • Drag and Drop the Widget you need to make floating.
  • Go to Options tab of that particular widget.
  • Go to Position Styles.
  • Enable the Position Style to start positioning your element.
  • Choose Position as Fixed and set it's vertical and horizontal position to fix the element to your desired place and you are good to go. You will see the Fixed Positioned Widget floated all over your Page.

Description

To make any widget Floating, you have to follow the below points.
  • Drag and Drop the Widget you need to make floating.
  • Go to Options tab of that particular widget.
  • Go to Position Styles.
  • Enable the Position Style to start positioning your element.
  • Choose Position as Fixed and set it's vertical and horizontal position to fix the element to your desired place and you are good to go. You will see the Fixed Positioned Widget floated all over your Page.

Options

  • Width: You can set the width of element to Full Size or any custom size you want. Selecting Custom as Width allows you to set custom width size position to your element.
  • Alignment: You can set the widget alignment to Left, Center or Right with in your set width size.
  • Height: You can set the height of element to Full Size or any custom size you want. Selecting Custom as Height allows you to set custom height size position to your element.
  • Position: You can position your dragged widget to Absolute, Fixed, Relative the way you want. Selecting any position will allow you set it's Vertical and Horizontal Position.
  • Vertical Position: This position will allow you to set your Widget's Vertical Position to Top or Bottom. Selecting the desired vertical position will allow you to set the Vertical Offset of the Element.
  • Horizontal Position: This position will allow you to set your Widget's Horizontal Position to Left or Right. Selecting the desired horizontal position will allow you to set the Horizontal Offset of the Element.
    Was this page helpful?
    Newsletter Subscription
    Subscribing you to the mailing list